Blog Archive

Wednesday, April 28, 2021

Arduino UNO for Middle school, High school, and University Students

ARDUINO UNO


The Arduino UNO is the perfect board for beginners who want to learn about electronics and programming. The UNO is the most stable board you can start with if this is your first time tinkering with the platform. The Arduino UNO is the most famous and well-documented board in the Arduino family.


FUTURE ENGINEERS, SCIENTISTS AND ARTISTS SHOULD BE EMPOWERED

Arduino Education develops the next wave of STEAM services to support students as they progress through middle school, high school, and university.


Arduino Uno R3

The Arduino Uno R3 is a microcontroller board based on the ATmega328P. It comes with everything you need to support the microcontroller; all you have to do is plug it into a PC via USB and power it up with an AC-DC adapter or a battery to get started. Uno is an Italian word that means "one" and was chosen to commemorate the release of Arduino's IDE 1.0 programme.


Arduino Uno R3 Specifications

The Arduino Uno R3 board includes the following specifications.

  • Microcontroller ATmega328P 
  • Input voltage span from 7V to 12V
  • The operating voltage of the Arduino is 5V
  • Digital input and output pins 
  • Analog Input pins 
  • DC Current used for 3.3V Pin is 50 mA
  • DC Current for each I/O Pin is 20 mA
  • SRAM is 2 KB
  • ROM Memory is 32 KB 
  • boot loader memory 0.5 KB 
  • EEPROM is 1 KB
  • In-Built LED
  • The clock speed is 16 MHz
  • Arduino board weight is ~25 g
  • Dimensions of the Board are 68.6 mm X 53.4 mm

Arduino UNO Pinout Diagram
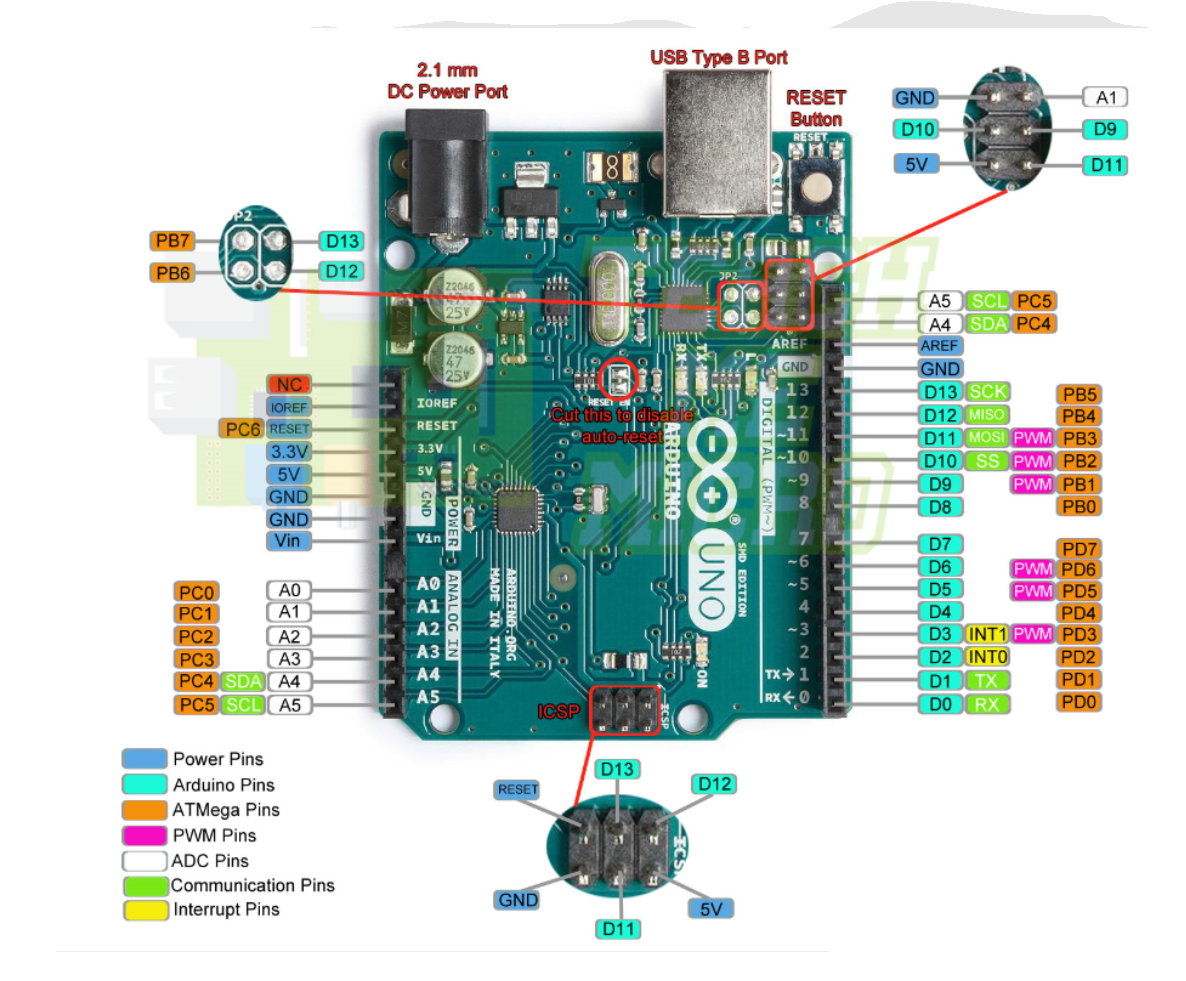


Digita Channel

Pin Details
Description
Remarks
D0
Pin 0
Serial UART (Receive pin)
D1
Pin 1
Serial UART(Transmit pin)
D2
Pin 2
Interrupt Channel 0
D3
Pin 3
Interrupt Channel 1
D4
Pin 4
D5
Pin 5
D6
Pin 6
D7
Pin 7
D8
Pin 8
D9
Pin 9
D10
Pin 10
Slave Pin
D11
Pin 11
MOSI
SPI Master Out-Slave In
D12
Pin 12
MISO
SPI Master In-Slave Out
D13
Pin 13
SCK
SPI Clock


Analog Channel 

Pin Details
Description
Remarks
A0
Pin 0
A1
Pin 1
A2
Pin 2
A3
Pin 3
A4
Pin 4
-
A5
Pin 5
-


Power Pins

Pin Details                                            Remarks
GND                                                        Ground
RESET                                                     Reset


5V
5V Source
3.3V
3.3V Source


1. RoboCraze UNO R3 SMD Board compatible with Arduino | Development Board with USB cable

2. Arduino UNO R3 Original | Genuine Arduino UNO Board with DIP ATmega328P

3. UNO Robotics Kit compatible with Arduino IDE


4. Multipurpose Starter Kit for Arduino IDE- NODEMCU (IOT) - Robotics For Beginners 

5. Quad Store LEVEL-2 kit with RFID and bluetooth compatible with Arduino IDE and Uno R3


Saturday, October 10, 2020

Python variable


Hi...

Let's go through some factors about Python Variables in this blog


1. What variables are?

2. Create our first variables in Python 

3. Learn about variable " type() " 

So let's get started

Well to understand easily we can consider Variable as a box where we can store data. Data can be of any type such as text, images, video, audios, etc.


Now, the variable contains two things :
1. Name
2. Value


A) Assign " Integer type " value in the variable name Number.
here "Number" is the variable name and the value assigned in it is "10" 👇.


Whenever we type the Number, it will show the contained value here "10"☝.


B). Now, We can assign " String type " data on the same variable
Number = "JK"


C). Now, We can assign "Float type " data on the same variable


let's check the type of value stored in our variable "Number"

How??

Yea!... you got it right it's now time to use  " type( ) " keyword :👇👇


Important Points :

#1. Python variables are case sensitive means variable name "Number" is different from "number".

#2. Python variables are Dynamically typed variable means there is no need to define a variable type like int, float, char, etc before assigning value. But in another languages like C, C++, Java, etc we need to define data type before assigning any value in the variables.  C, C++, Java are the statically typed() whereas python is Dynamically typed.

#3. The last value stored is retained in the variable.


Review :

1. Variables are like boxes that store data.

2. Variables can be defined as -     variable = value

3. In Python, Variable type can be changed Dynamically.

4. Use the type() variable to get variable type.


Great, enjoy practising till next blog comes☺...


Sunday, October 4, 2020

Python Boolean Operations

Python Boolean Operations: and, or, not 


Boolean operators such and, or, and not are also called logical operators.

" and " and " or "operators requires two variables whereas " not " operators need only one variable. 


1. "and " operator test example :

It is interesting to know that "and" is a short-circuit operator, it checks both the arguments if both the operands are true or both are false then it returns true. Whereas if any one of the operands is true and other operands are false then it returns false.

# boolean "and" operator test program


x= 5
y=10
print(x);
print(y);
if (x>3 and y>1):
   print("true")
else:
   print("false"


2. "or " operator test example :

Like "and" the "or" is also short-circuit operator, it also checks both the argument if any operand is true it returns true. Whereas, if all operands are false then it returns false.


# boolean "or" operator test program

x= 5
y=10
print(x);
print(y);
if (x>10 or y>12):
   print("true")
else:
   print("false"


3. " not " operator test example :

This operator is also called inverter operator which actually clarifies it's nature or function. It just provides the inverted output. Means if an operand is true then it returns false and vice-versa. It requires only one operand.


# boolean "not" operator test program

x= 5
y=10
print(x);
print(y);
if not (x > 10) :
   
print("true")
else:
   
print("flase"


Easiest Way to Start Python Coding


How to Get Started With Python using Google Colab?

In this blog, we will learn to use Google colab web editor and run code on a cloud platform. Once done with it, we'll write our first Python program using Colab.


Introduction 


Jupyter Editor :

The Jupyter Notebook is an open-source editor application that permits us to make and share the code as well as documents. It contains live code, conditions, perceptions and text. It utilizations include data preprocessing (like data cleaning, data combining, data noise reduction, etc ), numerical manipulation, mathematical simulation, factual displaying, information representation, AI, and significantly more.


Google colab : 

Google colab is similar to Jupyter Notebook. We can say" Colab is a Jupyter Notebook stored on google drive". We find the same structure and look of code editor consisting code and text cells as in Python. The benefit here is the cloud space and the speed due to the allocated server RAM. Basically, it reduces the struggling of execution delay while dealing with a large dataset or a larger number of epochs which makes use of colab best while working with the Machine Learning, Deep Learning and other AI domains.

Alright so let's get started...

Step 1: You should have a Gmail account.

Step 2: Search "colab" in google search engine.

Step 3: Colaboratory or " colab" window will appear.


Step 4: Then Go to the file and open a new notebook window.


Step 5: New Untitled window will appear.


Now we can start writing our first python coding on colab editor.

Type below-mentioned code on the editor :

print (" My first Python Code in Colab") 

then press left side arrow button  and run the code.


Congratulations! We just wrote our first Python program in Colab editor.

See how simple it is... 

This is the magnificence of Python programming language. 


Saturday, January 25, 2020

How to Install Python 3.8.x on windows10


How to Install Python 3.8.x on windows10


1. Introduction

 
What is Python? Python is a high-level, general-purpose programming language which was developed by Guido van Rossum and its first version released in 1991.the first standard version released as Python 1.0 in January 1994.

 It is used for:
  • Embedded Software
  • Data Analytics
  • Artificial Intelligence (Machine Learning and Deep Learning)
  • Web development
  • Software development
  • Mathematics,
  • System scripting and many more


2.Download and Installation 


Let’s take a look at how to install Python 3 on Windows System:

 Steps :

1. Click here Download to download Python IDE from its official site. Download Python 3.8.1(latest version as of date, ignore Python 2.7 )) for Windows, Linux/UNIX, Mac OS X, Other. Follow the instruction and Install it (Fig-01)


Fig-01


 Fig-02

2.  Python Releases for Windows, click on the link for the Latest Python 3 Release - Python 3.8.1.


  Fig-03

3. Scroll to the bottom and select either Windows x86-64 executable installer for 64-bit or Windows x86 executable installer for 32-bit.


4. Run the Installer. Once you have chosen and downloaded an installer, simply run it by double-clicking on the downloaded file. A dialogue box might appear that looks like this:


Fig-04


5. Important Note: Please make sure to check the checkbox that says Add Python 3.8.1 to PATH as shown to ensure that the interpreter will be placed in the execution path.


 Fig-05


6. After Installation, if you open python IDLE,  below mentioned shell will appear 


 Fig-06


Congrats !! Now You are ready with your Python IDLE